Reinforcement Learning with OpenAI Gym and Baselines
Are you interested in trying out reinforcement learning but don’t know where to begin? The OpenAI Gym and Benchmarks tools are a great resource for beginners looking to jumpstart their reinforcement learning journey. In this blog post I’ll be covering a brief introduction to reinforcement learning, what OpenAI Gym and Baselines are, and how to use them in your next project.
What is Reinforcement Learning?
Before we jump into using reinforcement learning (RL), we should clarify the kinds of problems RL can address. In a lot of machine and deep learning problems one uses a dataset to train a model to accomplish a given task. If this dataset includes the “correct answers” to the training set, we are employing supervised learning. For example, if we train an algorithm to classify images of dogs and cats, we can train with an already labeled dataset which can help guide the algorithm’s learning. However, if you are trying to train an algorithm to perform a certain task, like play a game or drive a car, there are no “right” answers for each action the algorithm must take. Reinforcement learning is a great tool for addressing these kinds of problems as it teaches an algorithm by rewarding good outcomes and punishing negative ones until the algorithm learns how to accomplish a task. While there are many nuances and different flavours of RL available today I will save that discussion for a future blog post as this is meant as a quick description of how to get up and running with this technology.
OpenAI Gym and Baselines
OpenAI Gym advertises itself as “a toolkit for developing and comparing reinforcement learning algorithms” which makes it a great starting point for playing with RL. If you visit their Environments page (https://gym.openai.com/envs/#classic_control) you can check out all of Gym’s supported environments to test your RL algorithm on. These vary from text-based Blackjack to trying to manipulate a pen with a robotic hand.
Once you find an environment you would like to solve, the next step is to train a model. To make this task more approachable for a beginner, OpenAI has created Baselines (https://github.com/openai/baselines) to go along with their Gym environments. Baselines contains implementations of many popular RL algorithms and creates a simple pipeline for training on their environments.
Install and Usage
To install OpenAI Gym and Baselines, first install Conda on your GPU machine (link to Conda install page).
Then, visit this link (https://drive.google.com/file/d/1Sd5GoTMZ9TypCBmU2SvaT39O66DMXr2_/view?usp=sharing ) to download the YAML file I created. This YAML file will allow you to easily install all of the packages you need to run OpenAI Gym and Baselines using your Conda environment. Once you downloaded the file, run the following two commands to install these packages into your environment. Make sure you are in the same directory as the YAML file you just downloaded.
conda env update --file gym_env.yml
conda activate gym
Now that we’ve downloaded all the Python libraries we need, it’s time to install Baselines. First, install Git if you don’t have it already (link to Git install page). Visit this link to the Baselines GitHub repo and clone the repo onto your machine. Then, move into your new Baselines directory and run the command below to install Baselines using pip.
pip install -e .
At this point you should have all the tools you need to start training your model. Feel free to contact me if you run into issues following these instructions or during training.
Training and Testing your Model
I chose to train using the DDPG (deep deterministic policy gradient) algorithm on the BipedalWalkerHardcore-v3 environment. However, you should feel free to try out one of the other algorithms listed on the Baselines README. Just be aware that some algorithms do not work on certain environments, so if you get errors when trying to train, try another algorithm. You can also try another environment available from Gym, although you may need to install some additional packages into your Conda environment to do so.
I used the command below to initiate my model training. Make sure to change the save_path variable to where you would like the trained model to be saved. The nohup command and the & at the end allow you to run in the background and exit your terminal without interrupting training. This is useful because this command can run anywhere from several hours to several days depending on the algorithm you use, the number of timesteps specified, and your hardware.
nohup python -m baselines.run --alg=ddpg --env=BipedalWalkerHardcore-v3 --network=mlp --num_timesteps=2e7 --save_path=/trained/model/location/goes/here &
Once training is done, it’s easy to visually check the model’s performance using the run script included in Baselines. Below is the command I used to see some runs using the trained model and capture the output as .mp4 video files. Note that you will have to change your load_path variable to match the save_path from the previous command.
python -m baselines.run --env=BipedalWalkerHardcore-v3 --num_timesteps=0 --load_path=/trained/model/location/goes/here --play --save_video_interval=1000 --save_video_length=1000
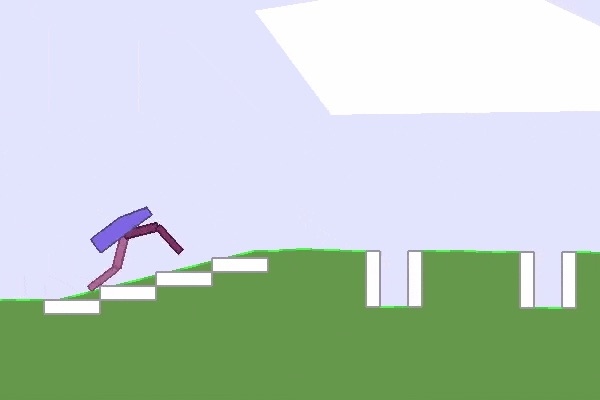
Clips from your run will be saved to your /tmp directory. Here’s a clip of one of the videos I recorded from running these commands. As you can see, the model is not perfect by any means but it did learn to walk fairly well and has started figuring out how to traverse obstacles. Now, the next step would be to either try out different models and training parameters available in Baselines or try training using your own algorithm. Now that you have a basic starting point for reinforcement learning, stay tuned for a deeper dive into reinforcement learning algorithms and how to further improve your agent’s performance.