Lenovo XClarity Administrator – Updating Lenovo Server Firmware
In this month’s article, I will be walking you through how to upgrade Lenovo server firmware using the centralized management tool known as Lenovo XClarity Administrator.
The first thing you will need to do is download the necessary updates required. There are 2 ways to download available server updates.
- The first method is to simply download them within XClarity Administrator and then install. This method does require XClarity Administrator to be able to access the internet which will depend on your company IT security policy.
- The second method if XClarity Administrator is not allowed to connect to internet, is to download them from Lenovo Support at the following link:
https://support.lenovo.com/ni/en/solutions/lnvo-lxcaupd
Once downloaded, they can be imported in XClarity Administrator and installed.
Either method will allow you to download Lenovo XClarity Administrator Virtual Appliance updates as well as Lenovo XClarity Administrator Repository Packs. For the purposes of this blog, we will focus on updating the repository packs which contains the server firmware and not updating the XClarity Administrator server itself.
Obtain Repository Packs
I will cover both methods outlined above for obtaining repo packs. Keep in mind, there are repo packs available for ThinkSystem, ThinkSystem V2, System X servers, Flex chassis’, etc. You will need to download and install each separately depending on what is applicable to your environment.
XClarity Administrator with internet access
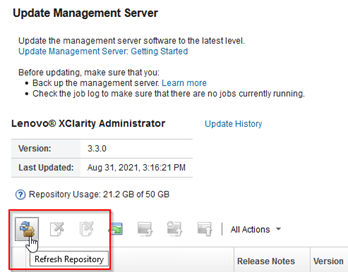
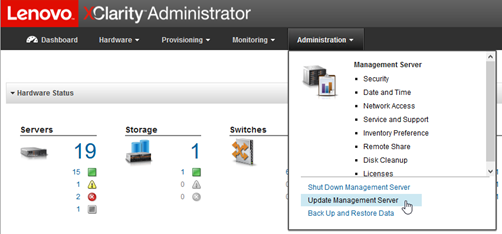
- Logged into XClarity Administrator, go to Administration then to Update Management Server

2. From the menu of available actions, click on Refresh Repository. This will pull in any available updates that can be downloaded and installed. This can be ran immediately or scheduled.
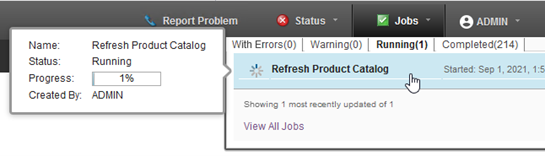
You will need to wait for the job to complete. That can be monitored from the Jobs menu at the top right of the page. Clicking on the job will take you to the Jobs Page for that job which will provide more information.
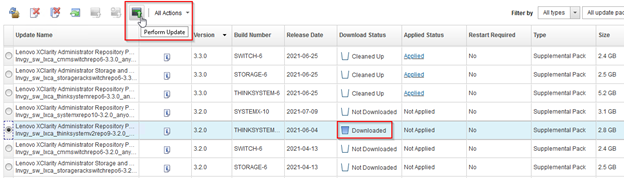
Below, you will see all available updates. In this example, I will be downloading and installing the ThinkSystem V2 version 3.2.0 server repo pack. You can see that the Download Status in “Not Downloaded”, and the Applied Status is “Not Applied”. Select the radio button next to the update and then click Download Selected from the menu.
You will be able to monitor the download progress from the Download Status column.
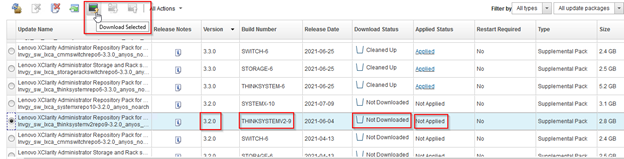
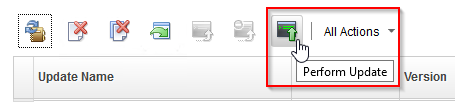
Once downloaded, select the radio button next to the update and then click Perform Update from the menu.
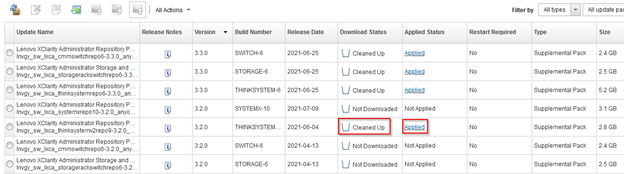
You will be able to monitor the update from the Applied Status column.
Once update is complete the Download Status will change to “Cleaned Up”, and Applied Status will change to “Applied”.
XClarity Administrator without internet access
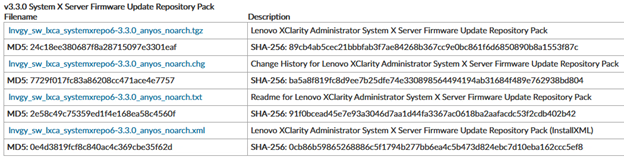
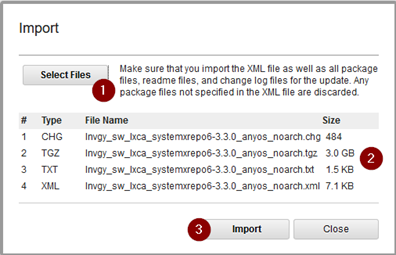
From the Lenovo Support link previously mentioned, download each of the 4 files containing repo pack, change history, readme, and XML for the desired system – in this example, I am downloading the System X version 3.3.0 server repo pack.
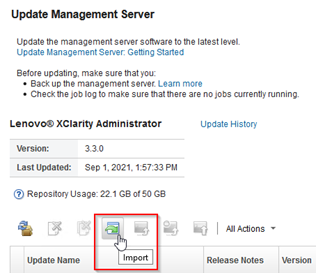
Logged into XClarity Administrator, go to Administration then Update Management Server
From the menu of available actions, click on Import.
Click on Select Files and then browse to and select all 4 files previously downloaded. Click Import.
Once the Import is complete, you can click on Perform Update from the menu. This is the same procedure as step 4 from the XClarity Administrator without internet access procedure above.
Once update is complete the Download Status will change to “Cleaned Up”, and Applied Status will change to “Applied”.
Perform Server Firmware Updates
Regardless of the method used above to obtain repository packs, there is a single method to perform server firmware updates. Firmware updates are applied using a Compliance Policy. When repo packs are downloaded and updated on XClarity Administrator, a predefined Compliance Policy is created per system (ThinkSystem, System X, etc.) and per version. There is also a reserved Compliance Policy called “Latest-firmware-in-repository” which simply assigns the latest firmware available to the server. You can also create your own custom Compliance Policy if required, but that will not be covered in this blog.
Disclaimer – Before proceeding with the following steps, ensure you have followed proper change control procedures and that you perform this during an approved maintenance window. Also, ensure server is in maintenance mode or application services have been gracefully stopped before proceeding, whichever is applicable.
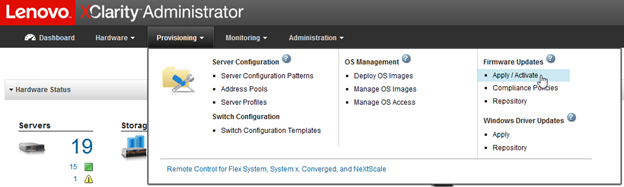
Logged into XClarity Administrator, go to Provisioning then Firmware then Updates then Apply / Activate
On the Firmware Updates: Apply / Activate page, under the “Update with Policy” tab (this is selected by default) you will see the list of managed devices. In this example, I will be updating an ESXi host (already in maintenance mode) to the version 3.3.0 System X repo pack. I could either choose the predefined Compliance Policy associated with the version 3.3.0 repo pack or choose to use the “Latest-firmware-in-repository” Compliance Policy – both will achieve the same result in this example. This will be a decision you make as an admin – it all comes down to how you wish to manage firmware. One other thing to note, you will only see relevant Compliance Policies to each device – for instance in this example, I am seeing only System X Compliance Policies since this is a System X server.
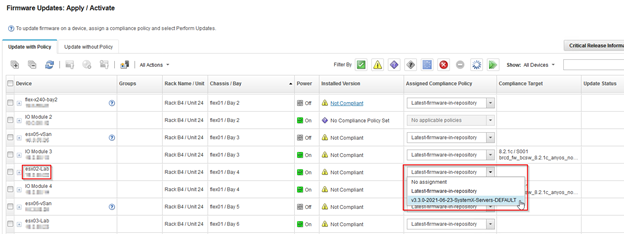
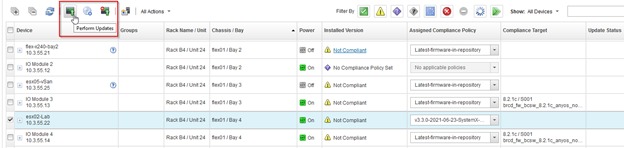
Place a checkmark next to the device you wish to perform firmware upgrade on and click Perform Updates from the menu above.
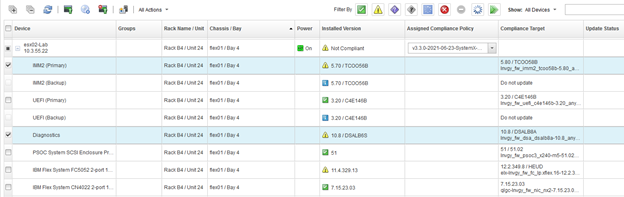
Quick Note – checking the device will upgrade ALL firmware. If for some reason you wish to only upgrade specific components, you can click on the “+” next to device name and more granularly select specific components as illustrated here.
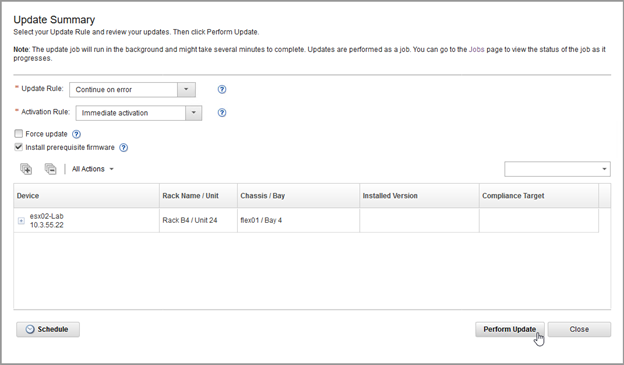
The Update Summary will open to review. You can change update behaviors using the Update Rule and Activation Rule drop down menus. You can also choose to Force update or Install prerequisite firmware by checking the respective boxes. Also, scheduling the update is possible by click the Schedule button at lower left. In this example, defaults will be used as shown. Click Perform Update.
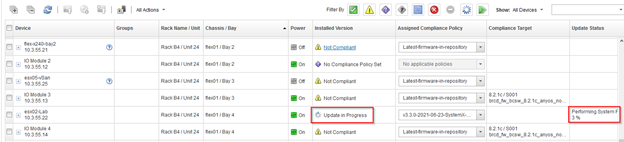
Once the update is started, monitoring can be done in a couple of places. First, you can monitor from the Firmware Updates: Apply / Activate page from the Update Status column.
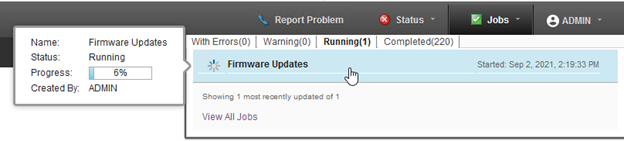
Second, you can monitor from the Jobs menu at the top right of the page.
Clicking on the job will take you to the Jobs Page for that job which will provide more information.
Once the firmware updates are complete, the server will restart. Once the server is back up, you can exit from maintenance mode or start application services, whichever is applicable.
Conclusion
This wraps up the process for upgrading Lenovo server firmware utilizing the centralized management tool Lenovo XClarity Administrator. Maintaining server firmware is a key component of a healthy infrastructure and doing so with XClarity Administrator makes it an easy and pain free process. I hope this was informative and educational.