Getting Started with NVIDIA NeMo’s Question Answering Models
Installation
First we need to download the NeMo sample Jupyter Notebook provided by Nvidia. You can do this by clicking the File tab in Google Colab and then clicking Download. Make sure to download the notebook version (.ipynb) rather than the python script version (.py). The link for the notebook is here: https://colab.research.google.com/github/NVIDIA/NeMo/blob/stable/tutorials/nlp/Question_Answering.ipynb
This notebook goes through getting started with training and inference with Question Answering NLP models. 3 different kinds of models are covered in this notebook: BERT-like extractive question answering, sequence-to-sequence for generative question-answering, and a GPT-like model for generative question answering. Read through the content in this notebook to learn more about how these models work and are used in NeMo.
Now get onto the machine you are looking to use for running NeMo. You should make sure that you have a good amount of computing power and a modern GPU at your disposal. If you are using a remote machine you need to use port tunneling to be able to view the Jupyter Notebook served by your remote machine on our local computer. I followed the instructions on this page (https://thedatafrog.com/en/articles/remote-jupyter-notebooks/) and used a command similar to the one below when SSHing into my remote machine while replacing username and remoteip with the information you need to SSH into your remote machine:
ssh -L 8080:localhost:8080 username@remoteip
Start by installing conda if you haven't done so already. Here’s a link to the installation instructions for conda: https://conda.io/projects/conda/en/latest/user-guide/install/index.html
Create a conda environment using the command conda create -–name notebook python==3.8
Activate the environment you just created using conda activate notebook. Then install Jupyter using the command conda install -c anaconda jupyter
Now transfer the NeMo sample notebook to the machine you are using for training. In my case I used SCP to do this. Start a Jupyter instance using the command below in the same directory as your uploaded NeMo notebook.
jupyter notebook --no-browser --port 8080
This should start your Jupyter instance. Now open a browser on your local machine and navigate to localhost:8080
You should see the name of the notebook you uploaded as an option in the Jupyter browser window. Click on it and you should see your notebook as shown in the screenshot below:

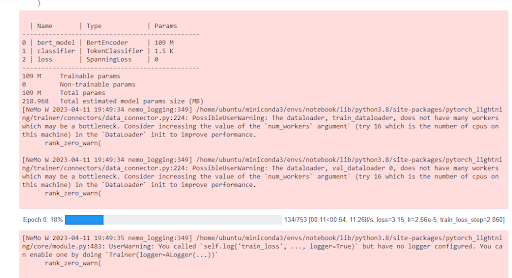
Note that this notebook only allows you to use one GPU. If your GPU isn’t big enough to handle training you may get errors in cell 16. Otherwise you know that training is happening successfully when you see output similar to the screenshot below. This tells you that training is progressing through the one epoch that will be run for each model in this notebook.
The notebook should run through doing one epoch of training, saving each model, and then some quick inference for each of the three different model types. Once you get this running successfully you can find more sample notebooks from Nvidia at this link: https://docs.nvidia.com/deeplearning/nemo/user-guide/docs/en/stable/starthere/tutorials.html
When you are finished, close the Jupyter browser window on your computer and use CNTL + C in your remote terminal to stop Jupyter.