Ansible Variables, Prompts and T-Shirt Size VMs
This post describes a technique for using Ansible variables to create a menu driven request for vSphere VMs and allowing for "t-shirt sizes" to govern CPU and memory. This technique could be used to size system disks as well as other enhanced request offerings for menu driven requests.
This post also shows examples of vars_prompt, include_tasks and some multi-line YAML fun.
Goal:
Produce varying VM hardware based on a size selection in a menu driven request using Ansible and it's VMware modules.
Solution:
Resources:
- CentOS 7.7
- Ansible Controller: 2.9 (from epel not from extras)
- Python pyvmomi: 6.7.3
- vSphere: 6.7 U3
- A template to deploy from with custom_spec in vCenter
Details:
We will develop a YAML file that holds the variables for our VM sizes.
Be sure to have Ansible 2.9 and Pyvmomi installed before you start.
In this case we have three VM sizes small, medium and large.
The resource numbers are specified in YAML syntax in a vars file placed inside a vars directory in our project.
From your Ansible Controller...
1- Create a working project directory to hold your file.
2- Create a vars folder in the project directory and cd into the vars folder
mkdir ansible-tshirt-vms/vars -p
cd ansible-tshirt-vms/vars
3- Use vim to create a file called sizes-vars.yaml, add the below content and save the file.
vm_mem_size:
  small:  4096
  medium: 8192
  large: 12288

vm_cpu_size:
  small: 2
  medium: 2
  large: 4
This example uses dictionary for the hardware size specifications based on the variables vm_mem_size and vm_cpu_size. You may modify the content to fit your needs. The sizes for memory are specified in MB as we will be using the vmware_guest module as our provisioner.
4- Change directory up to the root of the project working directory. (cd ..)
5- Create a new file called pb.vm-create-size.yaml and add the below content and save the file.
Now let's look at this file for a moment and discuss the contents.
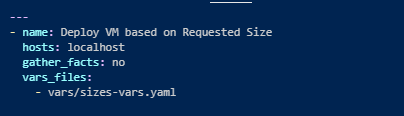
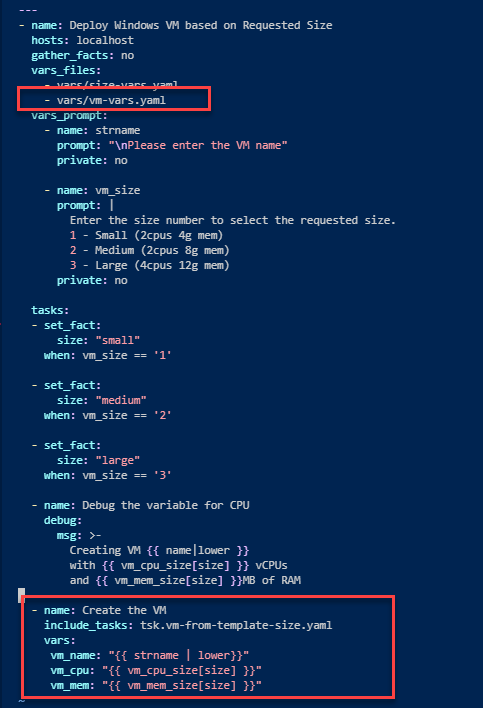
Here is a fairly normal play definition with the vars_files specifying the file we created holding our size specifications. This play will run only on the localhost as all of the vmware modules do.
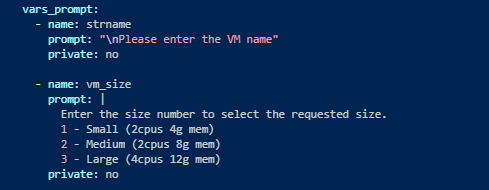
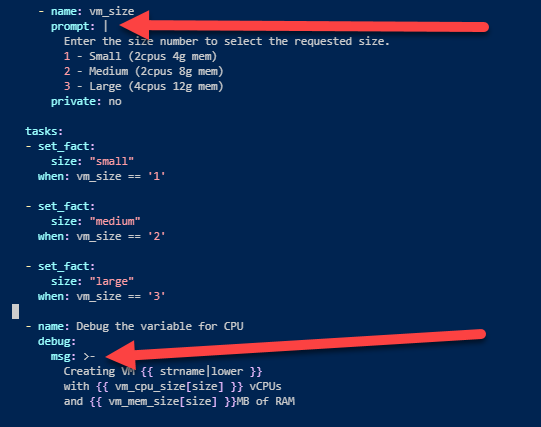
Here is the vars_prompt used to prompt for answers. In this case we are prompting for two bits of information. The name of the VM we are creating (strname) and a number corresponding to the size of the VM (vm_size). Our first variable is strname and the second is vm_size provided after the "-name:" tag.
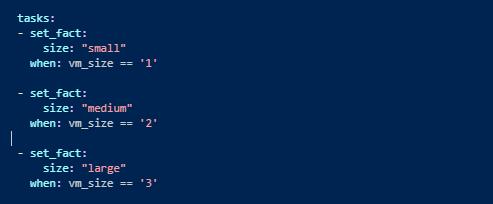
Here we take the input number related to the size and apply the strings small, medium or large depending on the number selected (1-3 in this case).
We set the Ansible fact size to the string small, medium or large depending on the number selected at the prompt. You could very well simply have the person type small, medium or large but I find the number selection makes things much easier to interpret.
We simply use the technique below to assign the string based on the number entered in the prompt (vm_size). This is done using the conditional when: and testing the input.
Here we leverage the new string variable set by the set_fact to access the value of the keys in vm_cpu_size and vm_mem_size. This section simply uses the debug module to tell you what is about to happen.
The two variables shown below will be interepredted as vm_cpu_size["small"] if the person selects 1 and vm_cpu_size["medium"] if 2 is selected and so on. This is because the fact size now holds this string.
{{ vm_cpu_size[size] }}
{{ vm_mem_size[size] }}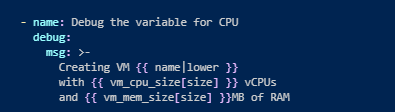
This allows the return on the value provided by that key as shown in the vars file we created.
vm_mem_size:
  small:  4096
  medium: 8192
  large: 12288

vm_cpu_size:
  small: 2
  medium: 2
  large: 4
With the above vars vm_cpu_size["small"] will equal 2 while vm_mem_size["small"] will equal 4096 and so on.
We now can run this without any real tasks to see the output from debug. This will verify our solution before we add the vmware modules.
Run the syntax-check on the playbook ... Disregard [WARNING] messages on inventory.
ansible-playbook pb.vm-create-size-no-task.yaml --syntax-checkRun the playbook.. My inputs and debug are shown below.
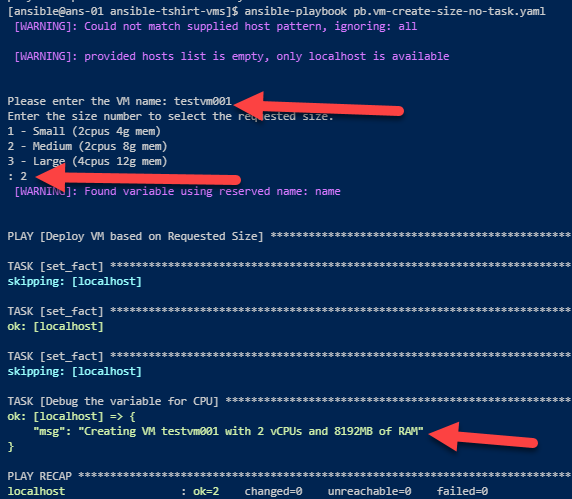
Now we see the result of our inputs so all we need to do now is add a task to create the VM and feed the sizes for CPU and memory as variables to the task.
Now we start to incorporate a task to deploy a VM using the vmware_guest module from VMware.
We will use variables to populate the module for vSphere specific data.
6- Create a variable file in the vars directory called vm-vars.yaml with the following contents. Replace all of the YOUR... with your specific data. Leave the folder variable as slash.
vcenter_server: YOURVCENTERSERVER
datacenter: YOURDATACENTERTARGET
vm_folder: /
cluster: YOURTARGETCLUSTER
vm_datastore: YOURTARGETDATASTORE
vm_network: YOURTARGETPORTGROUP
vcenter_admin: YOURVCADMINACCOUNT
vcenter_pass: YOURVCADMINPASSWORD
custom_spec: YOURCUSTOMSPECFORTHETEMPLATE
vm_template: YOURSOURCEVMTEMPLATE
7- Save the file and verify variables files.
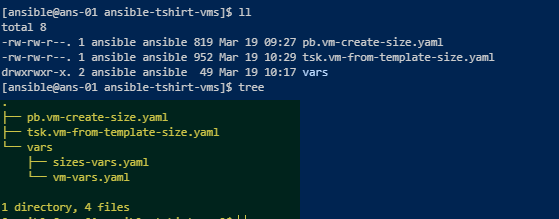
You ansible-thsirt-size/vars directory should now contain two files. One for the VM size (sizes-vars.yaml) definitions and another for the vCenter resource definitions (vm-vars.yaml).

8 - Pull down the task file for vm_guest from github from inside the anisble-tshirt-vms
wget https://raw.githubusercontent.com/theopscorner/ansible-tshirt-vms/master/tsk.vm-from-template-size.yamlYour directory structure for the project should now look like so..
9- Modify our playbook to use the new variables and task.
We need to add very specific lines to the file to inform the play to use these new items. We are also using include_task.
These items are shown in red boxes below.
The first red box simply adds our vm-vasr variable file and the second box will call the task file we just pulled down.
I have provided the below code snippet to make things easy for the task. You are on your own for the vars_files entry. Mind your indentations.
  - name: Create the VM
    include_tasks: tsk.vm-from-template-size.yaml
    vars:
     vm_name: "{{ strname | lower}}"
     vm_cpu: "{{ vm_cpu_size[size] }}"
     vm_mem: "{{ vm_mem_size[size] }}"
10- Check syntax and run the playbook.
[video width="1090" height="796" mp4="https://www.markiiisys.com/wp-content/uploads/2020/03/ansible-vars-vm-size.mp4"][/video]
You should also be left with output from the vmware_guest_info module. That portion is not displayed here.
I also use a couple instances of YAML syntax for multiple line use and block scalars with chomps and literals.
These I use to make the YAML more readable as oppose to using single line with breaks. These are super useful and I use them all of the time.
Details for this can be found here.
Hope this post was helpful.. All of the source code for this project can be found here. Enjoy!